下载安装

从[官网](https://www.elastic.co/cn/downloads/elasticsearch)下载Elasticsearch 7.4.1,linux版本的。

解压

tar xf elasticsearch-7.4.1

运行

sh elasticsearch-7.4.1/bin/elasticsearch

直至出现如下情况方为正常的:

  {
"name" : "node-1",
"cluster_name" : "elasticsearch",
"cluster_uuid" : "GJ8qGH3hR6eO6ZZO2YnG4A",
"version" : {
"number" : "7.4.1",
"build_flavor" : "default",
"build_type" : "tar",
"build_hash" : "fc0eeb6e2c25915d63d871d344e3d0b45ea0ea1e",
"build_date" : "2019-10-22T17:16:35.176724Z",
"build_snapshot" : false,
"lucene_version" : "8.2.0",
"minimum_wire_compatibility_version" : "6.8.0",
"minimum_index_compatibility_version" : "6.0.0-beta1"
},
"tagline" : "You Know, for Search"
}


出现的问题

1、jdk版本不匹配

elasticsearch-7.x版本内置jdk的版本。
编辑以下命令:
vi /usr/local/elk/elasticsearch-7.4.1/bin/elasticsearch-env

在图示部分加入jdk的路径即可。如图所示:

小Q截图-20191029173631.png

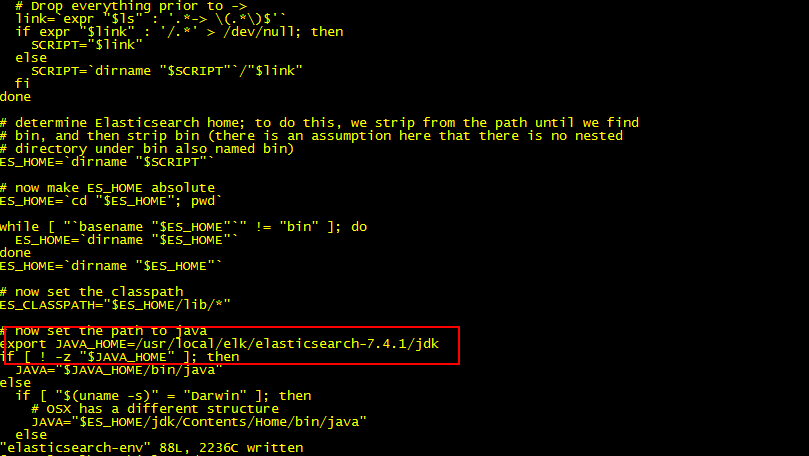
export JAVA_HOME=/usr/local/elk/elasticsearch-7.4.1/jdk

2、can not run elasticsearch as root

出现如下错误:

org.elasticsearch.bootstrap.StartupException: java.lang.RuntimeException: can  not  run  elasticsearch  as  root

该问题是因为运行es不能使用root用户,因此要新建用户es。

useradd es
passwd es

修改文件所属为es

chown -R es:es /usr/local/elk/elasticsearch-7.4.1

之后切换es用户:

su es

再次执行即可。

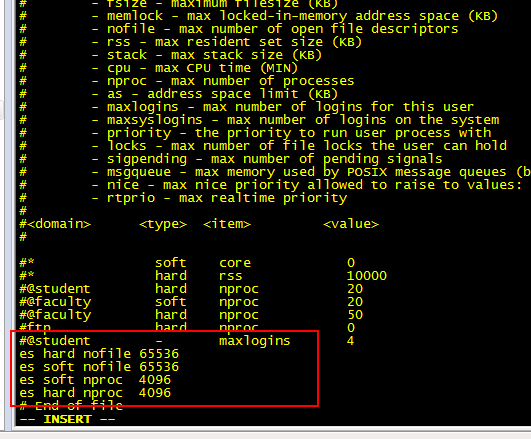
3、 max file descriptors [4096] for elasticsearch process is too low, increase to at least [65535]

解决:

vim /etc/security/limits.conf

在最后面追加下面内容

es hard nofile 65536
es soft nofile 65536

用户退出后重新登录生效。

4、max virtual memory areas vm.max_map_count [65530] is too low, increase to at least [262144]

解决:
切换到root用户

vi /etc/sysctl.conf 

添加

vm.max_map_count=655360

执行命令:

sysctl -p

即可解决。

5、max number of threads [3828] for user [es] is too low, increase to at least [4096]

解决:(和3修改的同一个文件)

vim /etc/security/limits.conf

在最后面追加下面内容

es soft nproc  4096
es hard nproc 4096

用户退出后重新登录生效。
最终这个文件如图所示:

小Q截图-20191029181034.png

6、外网无法访问

以上错误都修改完成之后,外网无法访问。
执行

curl 192.168.6.88:9200

返回结果:

  {
"name" : "node-1",
"cluster_name" : "elasticsearch",
"cluster_uuid" : "GJ8qGH3hR6eO6ZZO2YnG4A",
"version" : {
"number" : "7.4.1",
"build_flavor" : "default",
"build_type" : "tar",
"build_hash" : "fc0eeb6e2c25915d63d871d344e3d0b45ea0ea1e",
"build_date" : "2019-10-22T17:16:35.176724Z",
"build_snapshot" : false,
"lucene_version" : "8.2.0",
"minimum_wire_compatibility_version" : "6.8.0",
"minimum_index_compatibility_version" : "6.0.0-beta1"
},
"tagline" : "You Know, for Search"
}

本机可以访问,外网无法访问。

解决:

编辑 elasticsearch.yml 文件

node.name: node-1

前面的#打开

#network.host: 192.168.0.1
network.host: 192.168.6.88
#network.host: 127.0.0.1 这里把network.host 设置为自己的ip地址 网上有设置成0.0.0.0的应该也可以自己设置一下试试

cluster.initial_master_nodes: ["node-1"] 这里一定要这样设置,我就是这里没有这样设置出问题的,弄了好久

#在最后加上这两句,要不然,外面浏览器就访问不了哈
http.cors.enabled: true
http.cors.allow-origin: "*"

备注:elasticsearch.yml配置文件

  # ======================== Elasticsearch Configuration =========================
#
# NOTE: Elasticsearch comes with reasonable defaults for most settings.
# Before you set out to tweak and tune the configuration, make sure you
# understand what are you trying to accomplish and the consequences.
#
# The primary way of configuring a node is via this file. This template lists
# the most important settings you may want to configure for a production cluster.
#
# Please consult the documentation for further information on configuration options:
# https://www.elastic.co/guide/en/elasticsearch/reference/index.html
#
# ---------------------------------- Cluster -----------------------------------
#
# Use a descriptive name for your cluster:
#
#cluster.name: my-application
#
# ------------------------------------ Node ------------------------------------
#
# Use a descriptive name for the node:
#
node.name: node-1
#
# Add custom attributes to the node:
#
#node.attr.rack: r1
#
# ----------------------------------- Paths ------------------------------------
#
# Path to directory where to store the data (separate multiple locations by comma):
#
#path.data: /path/to/data
#
# Path to log files:
#
#path.logs: /path/to/logs
#
# ----------------------------------- Memory -----------------------------------
#
# Lock the memory on startup:
#
#bootstrap.memory_lock: true
#
# Make sure that the heap size is set to about half the memory available
# on the system and that the owner of the process is allowed to use this
# limit.
#
# Elasticsearch performs poorly when the system is swapping the memory.
#
# ---------------------------------- Network -----------------------------------
#
# Set the bind address to a specific IP (IPv4 or IPv6):
#
network.host: 192.168.6.88
#
# Set a custom port for HTTP:
#
http.port: 9200
#
# For more information, consult the network module documentation.
#
# --------------------------------- Discovery ----------------------------------
#
# Pass an initial list of hosts to perform discovery when this node is started:
# The default list of hosts is ["127.0.0.1", "[::1]"]
#
#discovery.seed_hosts: ["host1", "host2"]
#
# Bootstrap the cluster using an initial set of master-eligible nodes:
#
cluster.initial_master_nodes: ["node-1"]
#
# For more information, consult the discovery and cluster formation module documentation.
#
# ---------------------------------- Gateway -----------------------------------
#
# Block initial recovery after a full cluster restart until N nodes are started:
#
#gateway.recover_after_nodes: 3
#
# For more information, consult the gateway module documentation.
#
# ---------------------------------- Various -----------------------------------
#
# Require explicit names when deleting indices:
#
http.cors.enabled: true
http.cors.allow-origin: "*"
#action.destructive_requires_name: true